We were tasked to create a continuity sequence in groups of 3 that had to be within 20 shots. I believe our final piece came out a lot better than I expected, we stuck to the majority of the criteria required but we did end up using a little more than 20 shots. We also ended up using 2 camera movements instead of one. We initially had a contra zoom in our work, but because of the overall outcome and effect, we decided not to implement it into our final product. So we used a POV shaky cam and a panning movement. I believe the whole product came out at a high quality and looks great.
EVALUATION:
In the photo below, this is one of the scenes from our continuity sequence. Because I am wearing the colour red, we can assume that I am the main character. Where as the character wearing black, would be the villain because the colour black connotes misery, danger and can also be deceiving. The choice of clothing was successful because it really helps divide the main character from the villain.

Lighting:
In our continuity sequence, all the lighting you see in it is all natural. As we see in the photo below, the light is shining down on the main character, which further emphasizes his role in the film. But the villain is sitting on the darker side with hardly any light shining on him, also showing how he is a villain. In the room in which we filmed this scene we had a skylight up above which gave us natural lighting, giving an even greater effect. I believe that the natural lighting was very successful because it gave our film a clean high quality effect the whole way through.

High or low camera angles:
This is a low angle from one of the final scenes in our film. We used a low angle for this scene because the main character is jumping up and punching the villain, and as the camera is looking up at him it shows that he is the one with power and is more powerful than the person who is below him. Once again I believe that this low angle was successful because it gives the main character an overpowering look.

Different shot distances:
In our continuity sequence we had a variety of different shot distances, for example, we had a close up shot, an extreme close up shot and a long shot. Here is a close up of the package that was exchanged in our film. But we mostly used mid shots throughout the film, to keep that feeling of tension through the whole film. Here are some examples of the different shot distances implemented into our film.
Close-Up:

We used a close up of the package because we wanted the audience to be in suspense as they do not know what is inside this mysterious package. Because the only object in the shot is the package, it makes the audience think what could be inside.
Extreme Close-Up:

An extreme close up was used here to show that something is about to happen, which also keeps that sense of tension as we aim to keep that feeling throughout the whole film.
Long Shot:

Camera movements:
In our film we used 2 types of camera movement, for our POV shot we also had the camera shaking, giving the effect that someone is running, and we also used a whip pan at the very end.Both of these camera movement were successful because they both ran smoothly during the film and once again also gave that sense of tension.
Here is the POV shot:

180 degree rule:
We kept to the 180 degree rule during our film. It was successful because it does not confuse the audience at all, meaning that the characters do not suddenly change place, which will in turn end up confusing the audience. For example:

Here we see an over the shoulder shot, and the camera is on the right hand side of the scene. And as seen below, the camera has moved to film over the shoulder of the other character, but the camera has not moved to the opposite side of the two characters. This is also a shot reverse shot as the camera is filming over one person shoulder, and then in the next shot, is filming over the other persons shoulder.

Establishing shot:
We use an establishing shot to give the audience an idea of where the film is taking place. For example:
Here we have an establishing shot of the college, where the film was shot.

Match cuts on action:
We had various matches on action in our film, here is one of them:

In this first shot, we have him reaching into his pocket about to pull out his phone, at this point we switch to the next of, which is when he actually pulls the phone out of his pocket, creating the match on action. I believe these shots worked well and the transition between the two shots is smooth and are not jumpy.

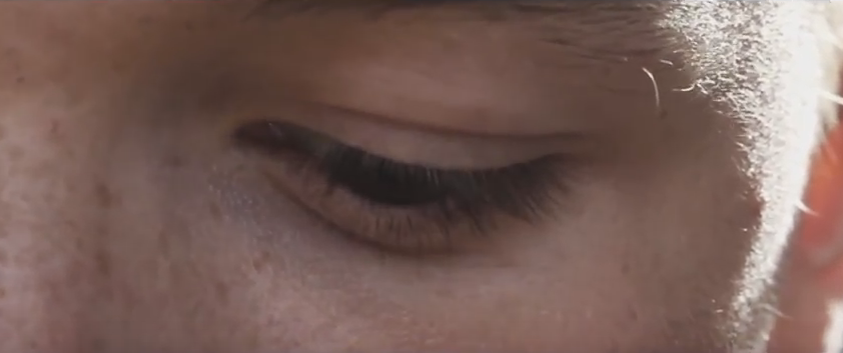
Eyeline match:
We used one eyeline match in our film, the eyeline match was used to show what the character is looking at. It first starts by focusing on his eye, then changes shot to the package, which is what he is looking at. I believe this eyeline match worked really well and was very effective because it captured what the character is looking at, and was once again smooth without any jumps in between shots.
Here is the shot in which the min character is looking down.
And here is the shot of what he is looking at, which creates the eyeline match.


This is really good work Luca - would be a very strong merit and with a bit more of a push could get to distinction level. Well done!
ReplyDelete